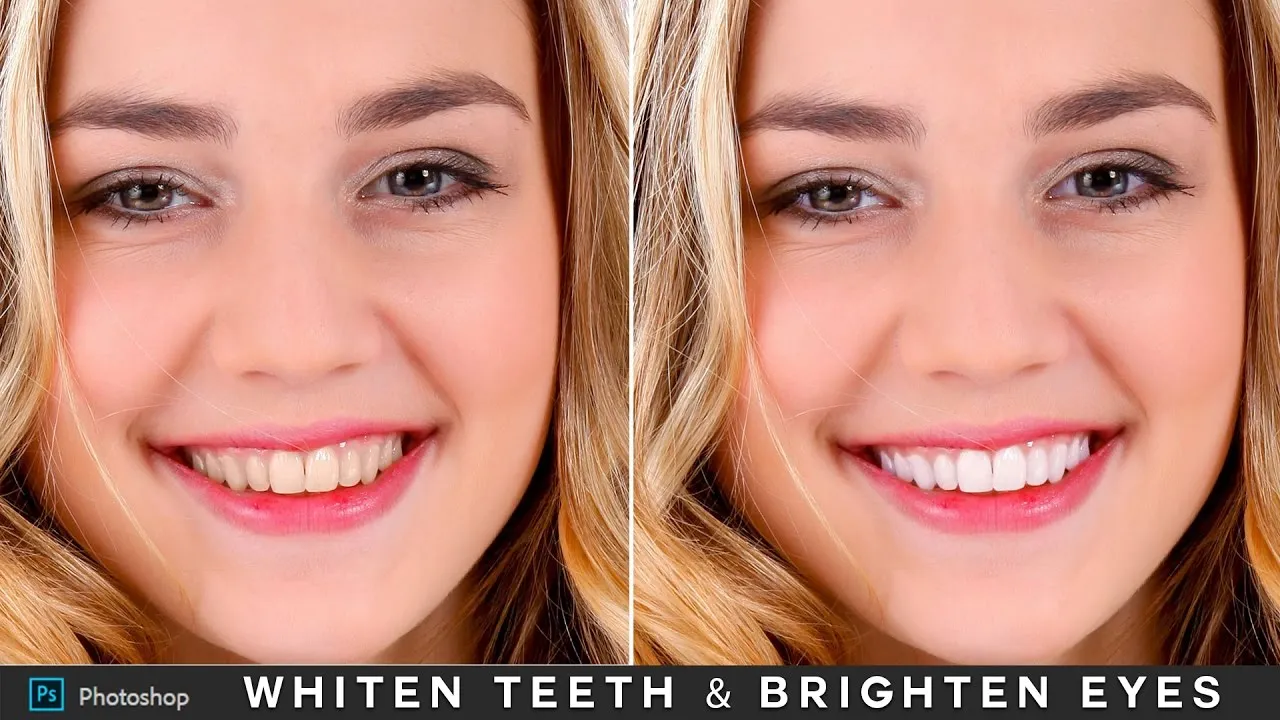
Mastering Teeth Whitening Picture Editing Techniques
The quest for the perfect smile often extends beyond professional teeth whitening treatments, encompassing the art of enhancing photographs. In today’s digital age, the ability to edit teeth whitening pictures is a valuable skill, whether for personal use, social media, or professional marketing. This guide delves into the essential techniques and secrets for achieving stunning results. We will explore the fundamentals of photo editing, focusing on how to brighten and enhance smiles while maintaining a natural and attractive appearance. By mastering these techniques, you can transform ordinary photos into captivating visuals that showcase radiant, healthy smiles.
Understanding Photo Editing Basics for Teeth Whitening
Before diving into specific editing techniques, it’s crucial to grasp the fundamentals. This involves understanding concepts like image resolution, file formats (JPEG, PNG), and the various tools available in photo editing software. Familiarity with basic adjustments such as brightness, contrast, and saturation is also essential. Proper photo editing ensures that the final image looks professional and enhances the desired features without looking unnatural. This includes understanding how light interacts with the teeth and how to use editing tools to create the illusion of a brighter, whiter smile. Consider the lighting in the original photo, the angle, and any shadows that might affect the appearance of the teeth.
Choosing the Right Photo Editing Software

The right software can make all the difference when editing teeth whitening pictures. Several options are available, ranging from simple, free apps to professional-grade software. Selecting the appropriate tool depends on your skill level and the desired outcome. Some software is designed for quick touch-ups on mobile devices, while others offer advanced features suitable for complex editing tasks. The key is to find a program that balances ease of use with the necessary features to achieve professional results. Consider features such as teeth whitening tools, color correction capabilities, and skin smoothing options. The choice of software is crucial for both beginners and seasoned editors, as it determines the range of tools available and the complexity of the editing process.
Professional vs. Beginner Editing Software
For beginners, user-friendly software with intuitive interfaces and automated tools is ideal. These programs often include pre-set filters and simple adjustment sliders to simplify the editing process. Professional software, on the other hand, offers extensive control over every aspect of the image, allowing for highly customized edits. Programs like Adobe Photoshop provide advanced features such as layer masks, precise color adjustments, and complex retouching tools. While more complex, professional software gives you the ability to create truly stunning results. Choosing the right type of software ensures you have access to the correct tools for the job, whether it’s a quick touch-up or a detailed editing session for teeth whitening pictures.
The Importance of Photo Quality
Photo quality plays a crucial role in the effectiveness of any editing process. A high-resolution image provides more detail and allows for more precise adjustments. Low-quality photos, on the other hand, can limit the editing capabilities and may result in a blurred or pixelated final product. Before starting the editing process, ensure the image is clear and well-lit. Good lighting is essential for accurately capturing the colors and details of the teeth and skin. Proper lighting will also make the editing process much easier, as you will be able to make more subtle and natural-looking adjustments. A well-composed, high-quality photo is the foundation for achieving professional-looking results when editing teeth whitening pictures.
Top 5 Editing Secrets for Teeth Whitening Pictures

These secrets are based on the photo editing tools used on the market. Here are some tips and tricks to have the best result when editing your teeth whitening pictures. This guide will help you improve your editing skills.
Secret 1 Color Correction
Color correction is the foundation of any successful edit. It involves adjusting the overall color balance of the image to ensure accurate and natural-looking tones. Start by correcting the white balance to eliminate any color casts, such as yellow or blue hues. Then, adjust the exposure and contrast to optimize the image’s brightness and depth. When editing teeth whitening pictures, ensure that the teeth appear white and not yellow or overly blue. Consistent color correction across the entire image creates a more polished and professional look. Color correction sets the stage for the rest of the editing process, allowing for more effective and realistic enhancements.
White Balance Adjustment
White balance is crucial for accurate color representation, particularly in teeth whitening pictures. It ensures that white objects appear white and that skin tones are accurate. Correcting the white balance eliminates any color casts caused by the lighting conditions. Adjusting the white balance helps create a natural-looking image. Most photo editing software includes a white balance tool that can automatically correct these issues or allows manual adjustments. Adjusting the white balance can create a more natural and pleasing final result.
Exposure and Contrast Enhancement

Exposure and contrast adjustments improve the image’s brightness and visual depth. Increasing the exposure can brighten a picture, while adjusting the contrast can enhance the separation between light and dark areas. Adjusting exposure and contrast can make a dramatic difference. It can make teeth appear whiter and the overall image more vibrant. However, be cautious not to overdo these adjustments, as it may cause the image to appear unnatural. Subtle adjustments often produce the best results, enhancing the overall appearance without making it look heavily edited.
Secret 2 Teeth Whitening
The primary goal in editing teeth whitening pictures is, of course, to whiten the teeth. Most photo editing software offers specific tools for this purpose, allowing you to selectively whiten the teeth without affecting the surrounding areas. Using these tools, you can carefully paint over the teeth to increase their brightness. Pay attention to the natural contours and highlights of the teeth. This prevents the teeth from looking flat or artificial. The key is to use these tools subtly, making incremental adjustments until you achieve the desired result. Proper teeth whitening can create a more attractive and professional appearance.
Selective Whitening Techniques
Selective whitening techniques involve applying adjustments only to the teeth, leaving the rest of the image untouched. This can be achieved using tools like selection brushes or masking features. By selecting the teeth, you can apply whitening adjustments without affecting the skin, gums, or other elements of the photo. These techniques prevent unwanted side effects, such as changes to skin tone or clothing color. These are the most effective ways to whiten teeth while maintaining a natural appearance.
Avoiding the Artificial Look

The goal of teeth whitening should be to enhance the natural appearance of the teeth. Be careful to avoid making the teeth appear overly white or artificial. This can be avoided by making gradual adjustments and evaluating the results. Subtle changes typically produce more natural results. Avoid excessive whitening that may appear unnatural and unappealing. It is important to maintain a balance, creating an attractive image without making the teeth look fake.
Secret 3 Shadow and Highlight Adjustment
Shadow and highlight adjustments can significantly enhance the appearance of the teeth. Properly managing shadows and highlights adds depth and dimension to the image. This is especially important for teeth, as it helps to emphasize their shape and shine. Adjusting shadows and highlights correctly can make the teeth look brighter and more attractive, creating a more natural-looking smile.
Highlighting the Smile
Highlighting the smile involves carefully adjusting the lighter areas of the teeth to enhance their brightness. This can be achieved using the highlight tool or by selectively brightening specific areas. Highlighting can make the smile more radiant and attractive. When highlighting, focus on areas where light naturally hits the teeth, such as the upper edges. This technique makes the smile look brighter and adds a sense of natural shine. This enhances the overall appeal.
Softening Shadows

Softening shadows can help create a more balanced and natural look. Harsh shadows can sometimes make the teeth look dull or appear unnatural. Use shadow adjustment tools to soften these areas, reducing the contrast and improving the overall appearance of the teeth. It is important to soften the shadows in order to make the smile look more attractive. This technique creates a softer and more flattering result.
Secret 4 Skin Tone Enhancement
Skin tone enhancement is crucial for creating a cohesive and polished final image. Uneven skin tones or blemishes can distract from the smile and make the image appear less attractive. Editing the skin tone involves adjusting the colors and texture to create a smooth, healthy appearance. This step ensures that the focus remains on the teeth and the overall beauty of the image. Skin tone enhancement creates a more polished and balanced image.
Smoothing Skin Texture
Smoothing skin texture involves reducing blemishes, wrinkles, and other imperfections to achieve a flawless appearance. This can be done using tools such as the healing brush or spot removal tools. Be cautious not to overdo skin smoothing, as it can lead to an artificial look. Use these tools subtly, preserving the natural texture of the skin. Using these techniques ensures the face appears smooth and even. This enhances the overall appeal of the image.
Reducing Redness and Blemishes

Reducing redness and blemishes on the skin can significantly improve the overall appearance. Use color correction tools to even out skin tones and eliminate redness. The healing brush and spot removal tools can also effectively eliminate blemishes. The focus should be on achieving a healthy, natural skin tone. Avoiding harsh edits ensures the image retains a natural appearance. Reducing redness and blemishes ensures that the focus remains on the smile and enhances the overall appeal of the image.
Secret 5 Fine Tuning and Finishing Touches
Fine-tuning and finishing touches include final adjustments that refine the overall appearance of the image. This may involve sharpening the image, adding a natural glow, or making small adjustments to the color balance. The final touches will help enhance the overall appearance, producing a more professional and polished result. These refinements are essential for achieving a high-quality, visually appealing image.
Sharpening the Image
Sharpening the image can enhance the details and clarity, making the teeth and other features appear more defined. However, be cautious when sharpening, as over-sharpening can lead to artifacts and an unnatural look. Use the sharpening tool subtly, enhancing the image’s details without making it look harsh. Sharpening enhances the teeth’s appearance and creates a more defined final image.
Adding a Natural Glow
Adding a natural glow can enhance the overall appearance of the image and make the teeth appear more radiant. This can be achieved using a variety of techniques, such as adjusting the highlights or adding a subtle glow effect. The goal is to enhance the natural beauty of the image without making it look artificial. A natural glow creates a more attractive and inviting image, highlighting the smile in the best possible way.
Common Mistakes to Avoid
Avoiding common mistakes is crucial for achieving a polished and professional-looking result. By understanding these pitfalls, you can refine your editing skills and produce more appealing teeth whitening pictures.
Over-Whitening the Teeth
One of the most common mistakes is over-whitening the teeth. This can result in an unnatural and artificial appearance, making the image look fake. The best results are achieved by making subtle adjustments and maintaining a natural look. Aim for enhancing the natural brightness of the teeth, rather than making them appear stark white. This helps to maintain the authenticity of the image and makes the smile more appealing. This keeps the image looking natural.
Ignoring Skin Tone Discrepancies
Ignoring skin tone discrepancies is another common mistake. If the skin tone around the mouth is not consistent with the rest of the face, it can draw attention and make the image look unbalanced. Ensure that the skin tones are even and natural, by adjusting the color balance and making small adjustments. Matching skin tones creates a harmonious and professional-looking image. A good editing strategy pays attention to details to create a cohesive and attractive final image.
Not Using the Correct Tools
Not using the correct tools or failing to understand their functionality can lead to unsatisfactory results. Choosing the right editing software and tools for the job is essential. Understanding the features and the best use of the tools available is important. Take time to learn the tools, experiment with different techniques, and practice to achieve the best possible results. Using the proper tools and techniques is the key to creating professional and appealing teeth whitening pictures.
Conclusion
Editing teeth whitening pictures is an art, combining technical skills with a creative eye. By mastering the secrets discussed, you can transform ordinary photos into stunning visuals. Remember to focus on natural enhancements, pay attention to details, and avoid common mistakes. Consistent practice and experimentation will further refine your skills, allowing you to create impressive and beautiful images. Embrace the techniques and secrets outlined in this guide. You can then confidently edit teeth whitening pictures. You will then be able to capture and enhance radiant smiles. With the right approach, you can significantly improve the quality of your images.