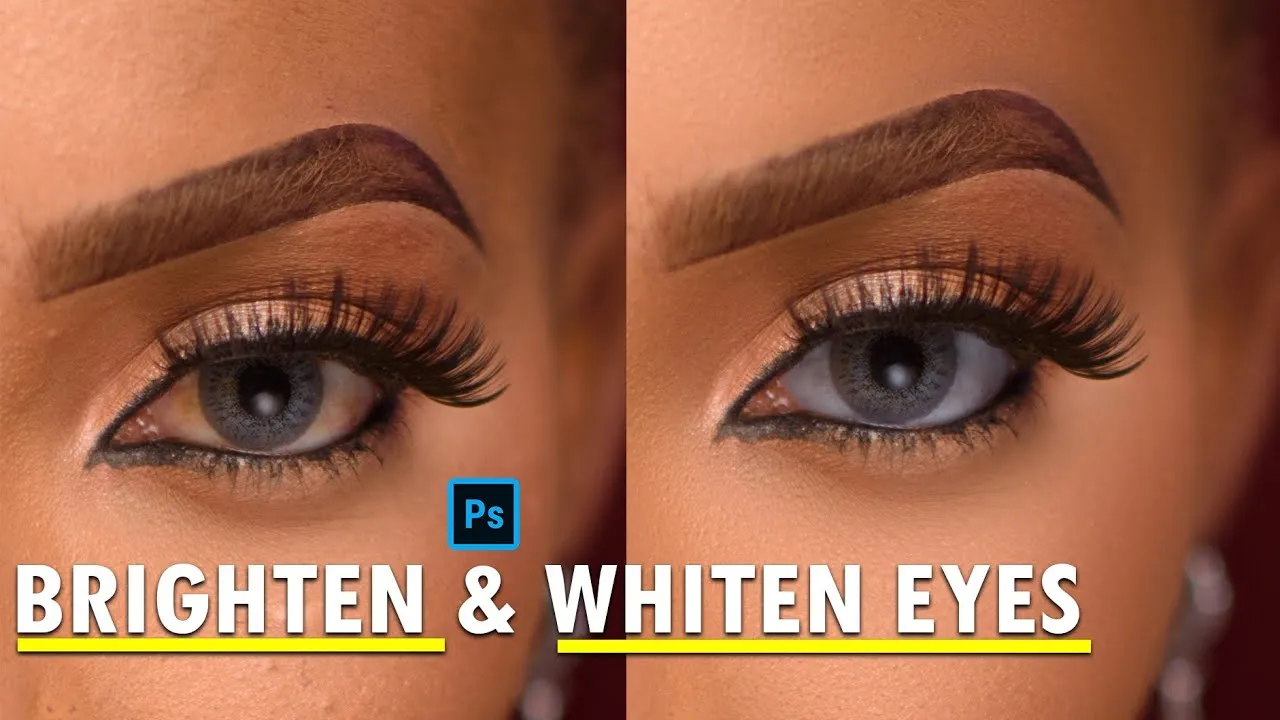
Understanding the Problem
In the realm of photography and image editing, the eyes are often the focal point of a portrait. They serve as windows to the soul, and when they appear dull, bloodshot, or discolored, it can detract from the overall impact of a photograph. Factors such as fatigue, allergies, environmental conditions, and even the camera’s flash can contribute to the appearance of red or yellow eyes. These imperfections can make a subject look tired, unhealthy, or simply less appealing. Therefore, the ability to whiten eyes in Photoshop is a valuable skill for photographers and anyone looking to enhance their images. It is a critical component of digital retouching, contributing significantly to the overall quality and professionalism of a photo.
Why Eye Whitening is Important
Eye whitening is crucial for several reasons. Firstly, it enhances the aesthetic appeal of a photograph. Bright, white eyes draw the viewer’s attention, making the subject look more alert, healthy, and youthful. Secondly, it corrects imperfections. Redness, yellowing, and other discolorations can be distracting, and removing them creates a more polished and professional look. Furthermore, eye whitening contributes to the overall impact of a photo by making the subject’s eyes appear clearer and more expressive. This can significantly improve the photograph’s emotional impact and make it more engaging for the viewer. Ultimately, eye whitening is an essential part of the post-processing workflow, leading to superior image quality and more captivating portraits.
Tools for Eye Whitening in Photoshop

Photoshop offers a variety of tools for eye whitening, each with its advantages. The most common are the Brush tool, the Adjustment Layers (Brightness/Contrast, Curves, Hue/Saturation), and the Dodge tool. The Brush tool allows for precise, manual control, enabling you to paint directly onto the eye area. Adjustment Layers, on the other hand, offer a non-destructive editing workflow, meaning you can always go back and modify your changes. The Dodge tool can selectively lighten areas, but it’s crucial to use it with caution to avoid over-whitening. Understanding the strengths and weaknesses of each tool will help you choose the best method for your specific needs. This will allow you to optimize your workflow and achieve the most natural-looking results possible when whitening eyes in Photoshop.
The Power of the Adjustment Layers
Adjustment Layers are a cornerstone of non-destructive editing in Photoshop. They allow you to apply adjustments like Brightness/Contrast, Curves, and Hue/Saturation without directly altering the original image pixels. This means you can easily edit, refine, and experiment with different settings without worrying about making irreversible changes. When it comes to eye whitening, Adjustment Layers provide exceptional flexibility. You can adjust the intensity of the effect, selectively target specific areas, and blend the changes seamlessly. This approach offers a high level of control, making it easier to achieve natural-looking results. Using Adjustment Layers is a fundamental skill for anyone serious about image retouching, as it preserves the original image data and ensures that every edit can be easily modified at any time.
Using the Adjustment Layers for Eye Whitening
The process of whitening eyes using Adjustment Layers involves several key steps. First, you’ll create a new Adjustment Layer, such as Brightness/Contrast or Curves. Then, you’ll use a selection tool (like the Elliptical Marquee tool or the Lasso tool) to carefully select the white part of the eye. This is followed by adjusting the Brightness and Contrast or using Curves to lighten the selected area. You can refine the selection by using the Feather option to soften the edges and create a more natural blend. The key is to work gradually and monitor the results closely to avoid over-whitening. Applying these steps in a controlled manner guarantees that you achieve a balanced and realistic outcome, avoiding harsh or artificial-looking eyes. Remember to adjust the opacity of the Adjustment Layer for a more subtle and natural finish.
Step-by-Step Guide to Eye Whitening

Here’s a simple, step-by-step guide to whitening eyes in Photoshop. This method prioritizes using Adjustment Layers for a non-destructive workflow. First, open your image in Photoshop. Duplicate the original layer by right-clicking on it in the Layers panel and selecting ‘Duplicate Layer’. This preserves your original. Next, select the white part of the eye using either the Elliptical Marquee Tool for a quick selection, or the Lasso Tool for more precision. After selecting the eye, create a new Brightness/Contrast or Curves Adjustment Layer. Adjust the Brightness and Contrast, or manipulate the Curves to whiten the selected area. Use a soft brush to gently erase any adjustments from the iris or pupils. Finally, refine the look by reducing the opacity of the Adjustment Layer if necessary. This will provide a refined and natural finish.
Selecting the Eye Area
Precise selection is crucial for effective eye whitening. Start by zooming in on the eye. Use the Elliptical Marquee tool to make a rough selection of the white part (sclera) of the eye. For more accuracy, especially with complex shapes, use the Lasso tool or the Pen tool. Carefully trace around the edge of the sclera, ensuring that you avoid the iris and surrounding skin. Once your selection is complete, refine the edges. Go to Select > Modify > Feather and apply a small feather radius (e.g., 1-2 pixels). This will soften the edges of the selection and create a more seamless blend. Accurate selection is paramount for avoiding unwanted artifacts and ensuring the result looks natural. Take your time with this step, as the quality of the selection directly impacts the final outcome.
Creating a New Adjustment Layer
After selecting the eye area, the next step is to create a new Adjustment Layer. In the Layers panel, click on the ‘Create new fill or adjustment layer’ icon (it looks like a half-filled circle). From the options, choose either ‘Brightness/Contrast’ or ‘Curves’. Brightness/Contrast is simple and straightforward, allowing you to adjust overall brightness and contrast levels. Curves gives you more control, enabling you to manipulate the tonal range with greater precision. Both options can be used effectively. Once you’ve selected your adjustment layer, a new layer will appear above your image layer. This layer will have a layer mask associated with it, which automatically uses your existing selection. This setup means your adjustments will only affect the selected eye area, keeping the rest of the image untouched.
Adjusting Brightness and Contrast

With the Adjustment Layer in place, you can now begin to adjust the brightness and contrast. If you’re using the Brightness/Contrast adjustment, simply drag the sliders to the right to increase brightness and contrast. Be careful not to overdo it; the goal is to whiten the eyes without making them appear overly artificial. If you’re using the Curves adjustment, click on the curve line in the window. A point will appear; dragging this point upwards will increase the brightness. For added control, you can add multiple points along the curve. Always monitor the changes closely and compare them to the original image. Make minor adjustments to fine-tune the look and achieve a natural and pleasing result. Subtle changes are usually more effective than extreme ones.
Fine-Tuning with Curves
Curves offer superior control for fine-tuning the eye whitening process. Open the Curves adjustment panel, and you’ll see a diagonal line representing the tonal range of your image. By adding points along this line, you can selectively brighten or darken specific tonal values. For eye whitening, gently lift the curve in the highlights section. This will brighten the white areas without drastically affecting the shadows. You can also slightly adjust the midtones to enhance the overall brightness. To further refine your results, use the Eyedropper tools within the Curves panel. Select the black eyedropper and click on the darkest part of the eye to set the black point, and then use the white eyedropper on the brightest area to set the white point. This calibration helps to ensure accurate tonal representation and a more natural appearance.
Tips for Natural-Looking Results
To achieve natural-looking eye whitening, avoid over-processing. Subtle adjustments are always better than drastic ones. Use a low opacity setting on your Adjustment Layers or brush tool. When using the Brush tool, apply the effect in multiple passes, building up the whitening gradually. Focus on the areas that need it most, such as the corners of the eyes or areas with redness. Always compare your work to the original image to ensure that the changes appear realistic. Another useful tip is to preserve the subtle details in the eye, such as the veins and textures. Over-whitening can obliterate these details, making the eyes look flat and artificial. The goal should be to enhance, not to completely transform.
Avoiding Over-Whitening

Over-whitening is a common mistake that can ruin an otherwise great photo. The most common sign of over-whitening is the appearance of bright, artificial-looking eyes. This can make the subject look unnatural and detract from the overall impact of the image. To avoid over-whitening, always work in small increments. Zoom in on the eyes and carefully examine the results after each adjustment. Use a low opacity setting on your adjustment layers and apply the effect gradually. Pay attention to the highlights and shadows in the eyes. Over-whitening can flatten these details, making the eyes appear unrealistic. Remember, the goal is to enhance the natural beauty of the eyes, not to make them appear completely white.
Dealing with Redness
Redness in the eyes can be addressed effectively using several techniques. Besides whitening, you can utilize the Hue/Saturation adjustment layer. Create a new Hue/Saturation adjustment layer and target the reds. Gently reduce the saturation of the red hues to minimize the redness. You may also slightly adjust the hue to shift the red tones towards a more natural color. For more targeted adjustments, you can use the Brush tool. Select a soft brush and sample a color from the white part of the eye. Then, carefully paint over the red areas to blend them seamlessly. Another helpful approach is using the Clone Stamp tool to copy and paste a clean area from the eye to cover the redness. Always work carefully and make subtle adjustments to avoid unnatural results.
Advanced Techniques and Considerations
For more advanced eye whitening techniques, consider working with the Dodge and Burn tools, but use them cautiously and selectively to brighten and darken specific areas of the eye. Another advanced method involves using the Color Balance adjustment layer to fine-tune the color of the whites of the eyes, correcting any subtle yellow or blue casts. When dealing with multiple subjects, apply your adjustments consistently across all the photos to create a cohesive look. Always remember to consider the individual characteristics of each eye, such as the color, shape, and existing imperfections. Advanced users may also experiment with Frequency Separation to refine the texture of the eye, creating a smoother and more natural result. With these advanced tools and techniques, you can perfect your eye whitening workflow.
Color Correction for Realistic Results

Color correction plays a vital role in achieving realistic results. Often, the whites of the eyes can have slight color casts, such as yellowing. Using the Color Balance or Hue/Saturation adjustment layers, you can correct these casts. Select the whites and slightly adjust the color sliders. Add a touch of blue to counteract yellowing or a touch of yellow to counteract excessive blueness. Be extremely subtle when making these adjustments, as even small changes can significantly impact the final result. Another key aspect of color correction is matching the color of the whites of the eyes to the overall skin tone. If the whites of the eyes appear too stark, they may look unnatural. Blend them by slightly adjusting the hue or saturation to blend with the skin color. Color correction will ensure a realistic and harmonious appearance, blending the eyes seamlessly into the final image.
Handling Different Eye Colors
Different eye colors may require slightly different approaches. For blue or green eyes, excessive whitening can make the eyes appear washed out, so a more subtle approach is necessary. With brown eyes, you might need to be more careful to avoid making the whites of the eyes appear too stark compared to the darkness of the irises. For all eye colors, pay close attention to the surrounding skin tone and adjust your color correction accordingly. Make minor adjustments based on the eye’s characteristics. In addition, when working on multiple photos, ensure consistency across the images by using the same adjustments for the same eye colors. This consistency will ensure that your retouching workflow is professional and refined, creating visually appealing and cohesive results.
Conclusion
Whitening eyes in Photoshop is a powerful skill that can significantly improve the quality and impact of your photos. By mastering the tools and techniques described in this guide, you can enhance the beauty of your subjects, correct imperfections, and create more captivating portraits. Remember to work gradually, avoid over-processing, and always strive for natural-looking results. With practice and attention to detail, you’ll be able to transform your images and create stunning visual content. Continue experimenting with different tools and techniques to refine your workflow and develop your own unique style. Happy editing!